In this article
The three failures and how to tell them apart
The three failures — Broken Band, Smiley Band (partial band rupture) and Missing Band — are addressed together by the packaging technical guide precisely because they share the same root causes. The difference is only the severity of the visible defect:
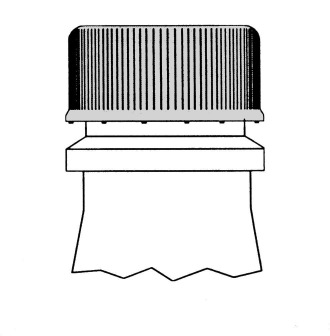
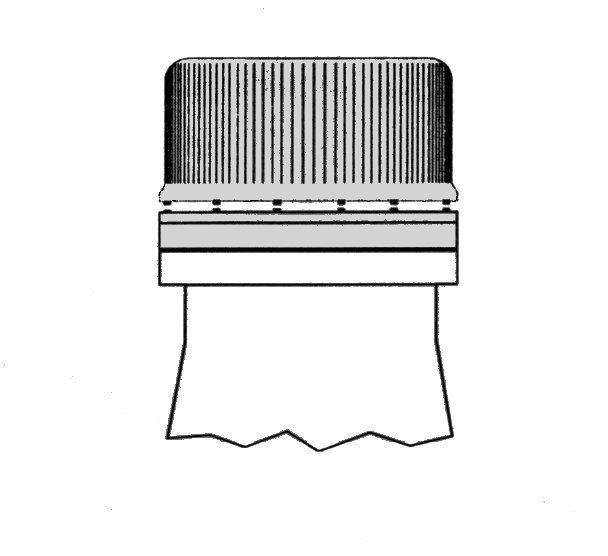
- Broken Band: complete horizontal separation of the band. The cap is intact, but the tamper-evidence band has separated all the way around.
- Smiley Band: partial horizontal separation — the band hangs like a "smile" over part of the circumference.
- Missing Band: the cap reaches the line already without a band — lost before application, during transport, feeding or sorting.

From the consumer's standpoint, all three compromise the band's primary function: showing whether the package has been opened. For the line engineer, they are the same problem with different levels of manifestation.
Diagnosis trap: check cocked cap first
If the cap thread is damaged, the root problem may be a cocked cap (tilt at the moment of application) and not the band itself. See the cocked cap diagnosis first — correcting the tilt often makes band defects disappear as well.
Possible causes — Cap
Cap condition before application carries huge weight in these defects. Cold caps break, poorly stored caps deform, lots with low pull test give way under any load:
| Item | Cause | Solution |
|---|---|---|
| 2.1.1 | Excessively cold caps. | Condition caps between 18 and 35 °C for at least 24 hours before use. This conditioning is still the most common mistake when the truck arrives early in the morning and production starts before noon. |
| 2.1.2 | Caps damaged in storage or handling. | Inspect boxes. Open by cutting or pulling the tape carefully. Cap pallets must not be stacked more than 2 pallets high. |
| 2.1.3 | Fragile band or low pull test. | Engage the supplier's technical support for sample testing. Pull test low from the factory cannot be solved by machine adjustment — it requires a lot change. |
Possible causes — Bottle
The bottle finish, if out of dimensions, forces the cap against the band during threading — and the band ruptures:
| Item | Cause | Solution |
|---|---|---|
| 2.2.1 | Dimensional excess on the bottle finish. | Check with a "go/no-go" gauge. Contact the packaging supplier. |
Possible causes — Capper
This is the longest and most frequent list. Wrong vertical load, sorter speed above the recommended range, transfer star out of sync — all of them break bands in series. Broken bands then often jam downstream flow; see the chute jamming diagnosis for the cascade effect:
| Item | Cause | Solution |
|---|---|---|
| 2.3.1 | Excessive vertical load. | Adjust between 20 and 40 lb. Load above that crushes the band against the cap shoulder. |
| 2.3.2 | Capper turret too high or too low. | Check head reference (Magna Torq: reference line matching the upper edge of the housing). |
| 2.3.3 | Foreign bodies in the chuck. | Remove stuck band remnants. Investigate the root cause of the inverted cap that produced the residue. |
| 2.3.4 | Bottle control guides and star wheels out of position. | Review star wheel sync, rear guide and part formats. |
| 2.3.5 | Sorter speed too high. | Up to 8 heads: 22 to 25 rpm. Above 8: 28 to 30 rpm. Higher speed breaks bands by disc friction. |
| 2.3.6 | Cap level in the sorter too high. | Keep between 1/4 and 1/3 of total capacity. Excess caps compress those below against the disc. |
| 2.3.7 | Sorter disc running continuously. | Install auto-stop sensors when the chute is full. |
| 2.3.8 | Sorter disc running in the reverse direction. | Check the correct direction in the manual. |
| 2.3.9 | Gap between sorter plates too small. | Add shims or adjust disc fixation. |
| 2.3.10 | Caps or glass remnants in the star wheel / anti-rotation bases. | Clean anything that may lift or push the bottle away from vertical. |
| 2.3.11 (C.I.H.) | Cap transfer star wheel out of adjustment. | Adjust the Cap In Head transfer star wheel to align the cap with the head. |
| 2.3.14 (C.I.H.) | Cap lock mini-cylinder not retracted. | Replace the mini-cylinder with a compatible OEM replacement part. Adjust air pressure between 4 and 6 kg/cm². |
| 2.3.16 (P.O.) | Pre-torque serrated arm spring with no or excessive tension. | Replace the spring with one of proper tension. |
| 2.3.17 (P.O.) | Cap launcher failure. | Inspect arm centering and opening (~25.4 mm). |
| 2.3.18 (P.O.) | Pre-torque misadjusted. | Serrated arm must engage at mid-height of the cap. |
Possible causes — Cap feeder
When the defect persists even with the equipment adjusted, the problem may lie before the sorter — in the feeding system. Practical test: feed the sorter manually with a suitable container. If the defect disappears, the problem is in the feeder:
| Item | Cause | Solution |
|---|---|---|
| 2.4.1 | Jet Flow air flow too high. | Reduce to the minimum possible without affecting feeding. |
| 2.4.2 | Protruding edges in feeder tubes. | Reinstall tubes eliminating edges where caps hit. |
| 2.4.3 | Bends with too small radius or obstructed tubes. | Replace or clean. |
| 2.4.4 | Ineffective decelerator. | Improve the design so caps actually slow down before falling into the sorter. |
Next step
Broken band is only one of the 13 most common capping problems. The complete technical guide also covers cocked cap, high cap, under-applied cap, split closure (cracked cap), CO₂ leak and more. All in a single, free reference.
Guide to Cap Application Problems
The 13 most common capper failures — diagnosis, root cause and correction. Free technical material.
Download the full guide →