In this article
Why measure the angle (and not just torque)
The application angle — the degree of cap rotation until full application — is a tool that complements removal and incremental torque. The practical difference is decisive:
- Torque is strongly influenced by friction: cap and bottle dimensions, ovality, burrs on the finish parting line.
- Application angle is generated independently of friction. It is a mathematical conversion from rotation to vertical movement, based on the known thread pitch.
That is why the angle is a more consistent measure of seal integrity. The conversion is not perfect because we work with plastic parts (caps and preforms come out of the mold with some bulging) and because, when the cap seats, the thread roots deform slightly. Even with these variations, the angle represents a better measure of seal integrity.
Rotation → vertical conversion table
Quick reference for the most common thread pitches. Use it to estimate the vertical cap displacement per 10° of rotation:
| Thread Pitch | Typical application | Vertical displacement (per 10° rotation) |
|---|---|---|
| 0.125" | 28 mm and 38 mm — continuous thread | 0.00347" (0.088 mm) |
| 0.250" | 26 mm — 3-start | 0.00694" (0.176 mm) |
| 0.286" | 38 mm and 43 mm — 2-start | 0.00794" (0.202 mm) |
Application example: 28 mm PCO 1810, the standard PET bottle finish for carbonated soft drinks.
Required materials
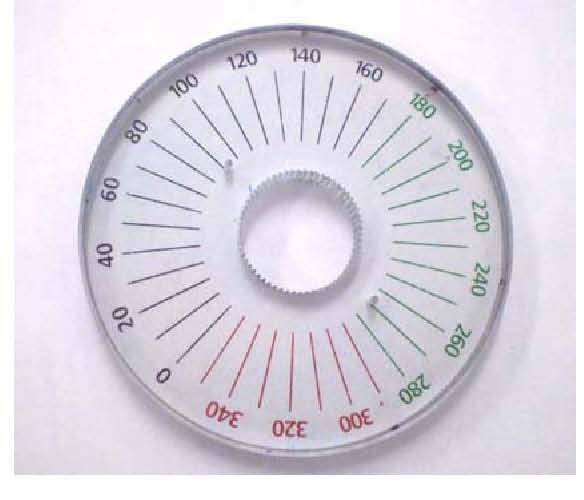
- 360° graduated protractor for 28 mm caps (or other sizes), with a splined hole that fits over the cap. Graduated every 10°, reading precision close to 5°. Important: the protractor hole must match the diameter of the cap under analysis.
- Fine-tip marker pen in two colors — blue and red, suitable for plastic surfaces.
Procedure — 7 steps
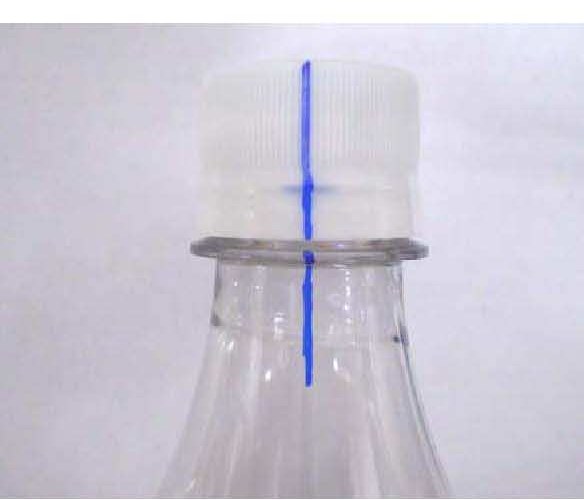
1. Mark the initial reference
Draw a vertical blue line across the cap shell, the tamper-evidence band and the bottle, passing through the support ring down to the neck — in an arbitrary position. The line should be as straight as possible.
It is critical that the blue line reaches the neck of the bottle. When you remove the cap, the tamper-evidence band will follow the rotation, and the original reference would be lost if it were only on the cap/band.
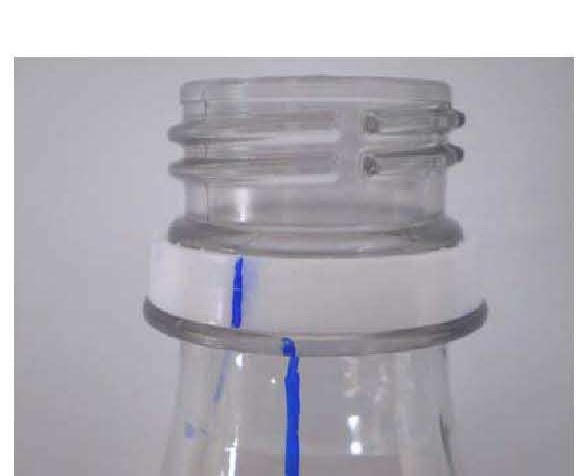
2. Remove the cap
Remove the cap from the bottle. Removing the tamper-evidence band is optional.
3. Mark the start of the bottle thread
Draw a vertical red line on the bottle finish, at the exact point where the bottle thread begins.
4. Mark the start of the cap thread
Draw a vertical red line on the outside of the cap, matching the start of the cap's internal thread — where threading onto the bottle should begin.
5. Reapply the cap
Place the cap back on the bottle finish up to the original mark (blue line), so that cap and neck are aligned again.
6. Position the protractor
Fit the graduated protractor over the cap and position the "zero" mark on the red line of the bottle.

7. Read the angle
Locate the red mark on the cap and read the corresponding value in degrees.
The final reading always gets an additional value of +360°. Example: a reading of 250° equals an application angle of 250° + 360° = 610°.
Special case: multi-start threads
For finishes with more than 1 thread start, you must be careful when removing the cap to keep the correct cap/bottle thread pairing. Maintain light upward pressure when removing the cap from the finish — that is the best way to preserve the pairing.
When the cap disengages, note which start of the cap thread corresponds to which start of the bottle thread. If this association is lost, the measurement result will be significantly different from expected — because the start of the cap thread will be associated with a different position on the bottle.
Solution: if this happens, simply restore the correct relationship between threads and redo the measurement.
Quick checklist
- ✓ Initial vertical blue line crossing cap, tamper-evidence band and neck.
- ✓ Red line at the start of the bottle thread.
- ✓ Red line at the start of the cap thread.
- ✓ Cap repositioned aligning the blue marks.
- ✓ Protractor with "zero" on the bottle's red line.
- ✓ Additional +360° reading for 28 mm / 38 mm continuous thread.
- ✓ For multi-start: maintain light pressure during removal to preserve thread pairing.
E-book: Cap Application Angle Measurement Procedure
The full technical procedure, with illustrations and step-by-step detail. Free material.
Download e-book →